
How to Process Your Own Poultry
Outbreaks during the COVID-19 Global Pandemic caused many large poultry processors to shut down. This created a rippling disruption in the food supply chain. As businesses later reopened, many processors had to turn away business because their schedules were quickly booked-out for the next year. This shortage of processors left many farmers in a bind with their market animals.
While some farms unfortunately experienced heartbreaking losses during the shortage, many small businesses and independent farmers banded together to process as much as they could on their own. On the other side of the coin, some consumers who were affected by the food supply chain shortages became inspired to start their own backyard flock, homestead, or farm operation to provide food for their families and communities.
If this is your first time processing your own poultry, or if you are simply looking for a different method or refresher course, you are in the right place! Processing poultry is a fairly simple task as long as the processor has the right equipment. We are here to encourage you that organically farming on small acreage and growing your own protein source is not only affordable and possible, but also a great learning experience for the whole family!
WARNING: This blog contains graphic images of humane animal processing. These animals were raised organically with great care and compassion for the sole purpose of feeding our family.
Getting Started
The birds photographed for this blog post were Cornish Cross broilers. They were fed New Country Organics Starter Feed for the first four weeks and then transitioned to New Country Organics Grower/Broiler Feed for the remainder of their growth. Free choice starter grit was provided at all times along with plenty of fresh water. For the first several weeks, the flock was kept inside a barn stall until they were large enough to be let out into an electrified chicken run with access to fresh pasture. The birds were processed at 8 weeks of age and averaged 6 to 8 pounds each.


Equipment Needed
While there are many methods to processing, we chose to purchase the following equipment:
- Culling cones
- Stainless steel table
- Poultry plucker
- Large plastic cutting board
- Deboning knives
- Stainless steel food scale
- Poultry shrink bags with zip ties
- Poultry labels
- 2 large aluminum stock pots with propane stand and tank
- Infrared thermometer
We had additional equipment including a folding table, several 5 gallon buckets, disposable gloves, towels, bleach, coolers with ice, and water hoses. Equipment costs can certainly add-up quickly, but there are many farm sales and discount websites with great deals available. The key to affordable farming is to plan ahead as much as possible. By purchasing your own equipment and maintaining it properly, you will be able to eliminate processing costs elsewhere and save money over time.
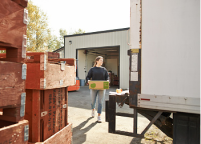
Setting-Up
To begin, we set-up all of our equipment in a semicircle. The large stock pots should be positioned near the culling cones, followed by the poultry plucker and water hoses.
Both stock pots should be heated to 160 degrees and maintained at this temperature for the duration of the processing. Coolers should be filled with several bags of ice and water to create an ice bath.
Culling Method

There are endless numbers of videos and blogs about how to humanely dispatch poultry. We follow Joel Salatin of Polyface Farm’s method of culling. This process is quick and efficient. Your first step will be to place the live bird upside down in the culling cone (this cradled, inverted position makes the bird very calm and provides a more peaceful experience) and make an incision just below the head to open the carotid artery. After the blood has drained for at least 1.5 minutes, the evisceration process can begin.
- Remove the bird from the culling cone
- Dip the bird head first into the 160 degree scalding pot up to the knees (see photo above).
- Swirl gently three or four times until the wing feathers are easy to pull without much resistance. Be careful not to leave the bird in the scalder too long, as it will start to cook the breast meat and will make the plucking process difficult.
- Remove the bird and place it into the plucker.
- Turn-on the hose and direct the water stream against the inside walls as you turn on the plucker. Plucking only takes approximately 15 to 20 seconds. Be careful not to do this for too long or you will tear the skin.
- Turn off the plucker and transport the bird to the preparation area (see photo below).
- In the preparation area, place the bird on its back and remove the head right at the base of the skull.
- Bending the foot down towards the table, cut the knee joint from top and bottom.
- At the base of the neck, make an incision in the skin to expose the crop. Gently separate the crop from the skin and top of the breast. Pulling the neck and crop away from the cavity of the bird, place the knife as close to the cavity of the bird as possible and cut through the spinal cord.
- Pulling the skin between the breasts and the vent, make a shallow incision large enough to create an opening to remove the intestines. Carefully cut all the way around the vent to remove the intestines completely without causing fecal contamination.
- With one hand bracing the bird, run your other hand inside the cavity of the bird along the rib cage. With a firm grasp, pull the internal organs out of the cavity of the bird. Set the intestines aside and remove any organs desired for consumption such as the heart, liver, and gizzard.
- Next, remove the tail and discard. Finally, rinse the bird thoroughly and place it into the ice bath. Ideally, the meat should be allowed to cool completely before bagging or processing further.
- After the meat has cooled sufficiently, remove from the ice bath and shake out any excess water.

Packaging a Whole Bird
- For whole birds, place the bird breast first into the poultry shrink bag.
- Insert the included straw into the cavity of the bird between the legs and twist the bag around the straw, squeezing out as much air as possible.
- Place a zip tie around the straw and cinch it.
- Lower the bag into the clean, 160 degree stock pot until the bag shrinks tightly around the bird.
- Remove the bag from the water and remove the straw from the cavity of the bird. Twist the bag to ensure as much air as possible is out of the bag prior to cinching the zip tie.
- Dry the outside of the bag with a towel before placing your poultry label on the bird.
- Weigh the finished product and write any notes on the label prior to freezing.

Parting and Packaging Select Meats
- For parting out the bird into different cuts of chicken, place the bird on its back and remove the wings from the joint.
- Next, slice along the sternum to remove the breasts. Peel the breasts back as you cut to ensure you remove as much meat as possible.
- With the bird still on its back, cut the skin on the inside of both thighs.
- Dislocate the joint for each thigh, flip the bird over to its other side, and cut around the joint to remove the quarter. The meat can then be bagged in the same manner as above.
It is important to allow your finished product to cool completely in a prepared cooler prior to placing it in your freezer. If you do not allow the meat to cool completely prior to freezing, your freezer can begin to thaw or have difficulty operating efficiently. Additionally, not allowing meat to cool completely prior to freezing can increase the risk of bacterial growth.
These are the methods we like to use to perform safe processing on our homestead. Hopefully this blog has shown you that you, too, can successfully process your poultry! If growing and processing your own poultry sounds like something you are interested in and you’re searching for guidance on getting started with chicks, check-out our New Country Organics' Beginner's Guide for Raising Chicks.
Have questions? Drop us a line. We are here to help!